Next Topic "Alerts RM BackOffice"
Reports may be sent using one of two methods: Schedule reports to run at a predetermined time /date or to manually send reports at will. Both methods require setting up reports groups with individual reports in the RMReports Module prior to setting up a schedule or emailing from the Message Definition form.
Note: Emailing any reports requires RMMailer to be running on the server computer for email(s) to be sent. If RMMailer is not running at the time emails are supposed to be sent (scheduled or manual), they will be held and then sent when RMMailer is started. In addition, RMAlertd.exe must be running for scheduled reports. It is recommended both RMAlertd.exe and RMMailer.exe be added to RMStart.
Reports may also be emailed directly from the RMReports Module. Please refer to the Version 19 RMReports Guide for instructions.
It is highly recommended that you create separate reports in a separate folder for sending reports. You will not want to use existing reports because they will be used for other purposes and employees may inadvertently change report filters. In addition, Restaurant Manager will send all reports in a folder at the scheduled time. For example, let’s say you scheduled to send the report folder “Sales Reports”. Restaurant Manager would send all thirty reports contained in the folder to the recipient at the scheduled time. Obviously, this would be an undesirable action. For these reasons, it is best to create new report folder containing the specific report(s) relevant to the recipient.
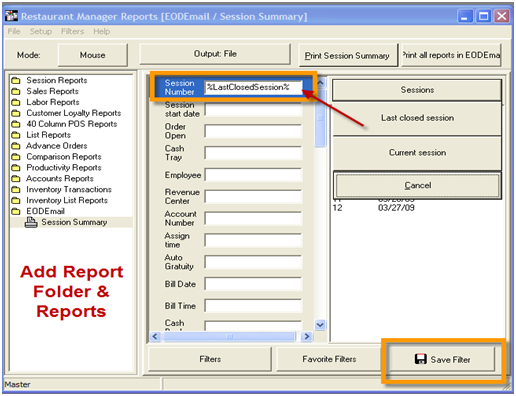
The name of the new folder should be distinct and easily identifiable (i.e. EODEmail, Robert’s Reports, etc.). You can set up as many new folders as needed. However, each recipient is capable of receiving only one report for per massage definition. You will need to set up a separate message definition if more than one report folder is to be sent.
Report folders can contain as many reports as needed. Each report will need a at least a date filter. This can be either a date or a session (session is preferred). It is best to use filters using percent (%) symbols on both ends of the filter (i.e. %LastClosedSession%). Avoid using specific dates: reports will continue to use the date until changed. Using the preset date will avoid having to adjust the reports on a daily basis.
In the screen shot below, we have set up a separate folder named “EODEmail”. The folder contains two reports. Both reports use the Session number filter.
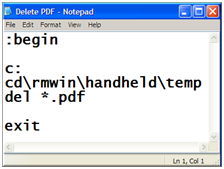
When generating the reports, Restaurant Manager will automatically assign a file name where it will place the reports. This is typically stored in the Handheld > Temp sub-directory within the rmwin directory (i.e. c:\rmwin\handheld\temp). The reports in this folder will remain until they are removed. You may do this manually or create a batch file using the following command:
Reports created in the RMReports Module can be scheduled to send via email to one or multiple recipients. Reports sets (groups) must be configured prior to setting up a schedule. There are three options for scheduling a report: Daily, Monthly, and at Session Close. Use the following instructions to setup a scheduled report set.
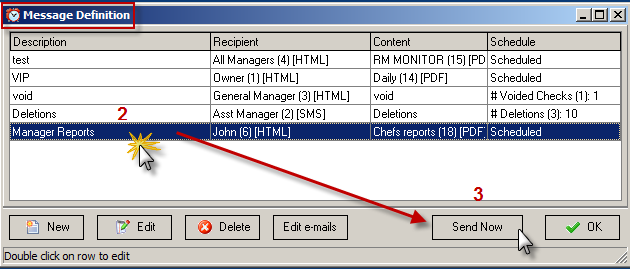
Open the Message Definition form (RMMsgDef.exe)
Click "New" to create a new message.
Type the name of the message (report set) in the Message Name field
Under the Recipient tab, click the "Recipient is Email" radio button, use the drop down menu to add a recipient(s). Use the ellipsis button to add one or more recipients if needed.
Click the Content tab and do the following:
Click "message content is a report group" radio button
Use the drop down menu to select a preconfigured report group from the RMReports module.
Under the "How to Deliver" options, select an option (i.e. as PDF attachment).
Click the Schedule tab and do the following:
Click the "Scheduled" radio button
Use the drop down menu to select a time period to deliver the reports. The time filters displayed below the drop down menu will change depending on the schedule type selected.
You can send a preconfigured report set on demand. You can either create a new report set or use a report set that is already scheduled. Use the following instructions:
Open the Message Definition form (RMMsgDef.exe)
Select the report to be sent on the Description list.
Click "Send Now"
Note: This only applies to report sets designated as scheduled. The "Send Now" function will not work for alert messages (i.e #Deletions)